The Importance of Machining Tolerances in the Manufacturing Industry
Tolerance matching in mechanical manufacturing is a rigorous and complex work, which requires the full attention of mechanical designers and manufacturers. In today’s society, people’s requirements for quality are extremely high. Therefore, in the process of any product manufacturing process, the standard processing tolerance is an important parameter that must be considered to ensure the consistency of the product micro scale.
What is machining tolerance?
Machining tolerance refers to the allowable variation range of geometric parameters during machining. Indicates the manufacturing accuracy requirements of the parts and reflects the ease of processing. Therefore, the smaller the tolerance value, the higher the accuracy of the part. But in practice there is no perfect process, even if modern manufacturing technology has minimized this value as much as possible, the value of machining tolerance can never be zero.
There are terms and definitions related to tolerance calculation
- Linear size
Dimensions generally fall into two categories: linear and angular. Linear dimension refers to the distance between two points, such as diameter, width, height, depth, thickness and center distance.
- Nominal size
The nominal size refers to the size determined during design.
- Limit size
Limiting dimensions are the two extremes of the allowable dimensions of a hole or shaft. One of the limit values is the largest size, called the upper limit size (Dmax); the other limit size is the minimum size (Dmin).
- Actual size
The actual size refers to the size obtained by measuring after the part is processed. Due to measurement errors, the actual size obtained by measurement is not the real size. The nominal size and limit size are given during design, and the actual size is between the upper limit size and the lower limit size.
- Size deviation
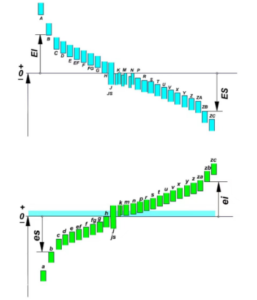
Dimensional deviation, referred to as deviation, refers to the algebraic difference obtained by subtracting the nominal size from a certain size (limit size, actual size, etc.). The algebraic difference may be positive, negative or zero, and the deviation value must be preceded by a plus or minus sign. The deviation is divided into limit deviation and actual deviation.
Upper limit deviation = upper limit size – nominal size
Lower limit deviation = lower limit size – nominal size
- Dimensional tolerance
Dimensional tolerance t (refers to the variation range of qualified actual size) = upper limit tolerance size – lower limit tolerance size
Since the upper limit size (deviation) is always greater than the lower limit size (deviation), the tolerance is an unsigned number and cannot be negative or zero.
Type of tolerance
- Dimensional tolerance. The variation of the allowable size is equal to the absolute value of the algebraic difference between the maximum limit size and the minimum limit size. the
- Shape tolerance. The total amount of change allowed for the shape of a single actual element, including straightness, flatness, roundness, cylindricity, line profile and surface profile 6 items. the
- Position tolerance. The total amount of change allowed by the position of the associated actual element to the datum, which limits the mutual positional relationship between two or more points, lines, and surfaces of the part, including parallelism, perpendicularity, inclination, coaxiality, There are 8 items of symmetry, position, circular beating and full beating.
Considerations When Working With Tolerances
When dealing with tolerances, planning in advance to effectively use resources and reduce the error rate of finished products can greatly improve work efficiency. Although the tolerance directly reflects the accuracy of the product, it is not the smaller the better. Because the smaller the accuracy of the product, the higher the cost, and the tolerance of the parts needs to be customized according to the actual needs of the parts. For example, the main purpose of the individual handicraft parts is beautiful, and the accuracy of the tolerance can be reduced to reduce the cost. But for the needs The spare parts for secondary assembly must adopt strict tolerances. Excessive tolerances may lead to assembly failure and unnecessary loss. When controlling tight tolerances, it is important to pay close attention to the following points:
- Cost: According to the prototype and usage of the designed parts, draw the relationship diagram between the cost increase and the tolerance zone decrease, and find out the critical value that meets the acceptable range of the specific project, and use the minimum tolerance that suits its budget.
- Inspection: After the product is completed, it enters the quality inspection stage to judge whether the final product is qualified. Unqualified products will be rejected for acceptance. Depending on the strictness of the tolerance, the time of the quality inspection stage will vary. The stricter the tolerance, the higher the time cost and the more complex testing equipment is required.
- Processing technology and method: Different processing technology requires different machinery and equipment, which will also significantly affect the tolerance of parts. The processing of some parts needs to go through a variety of different machines and equipment, so it is necessary to understand the tolerance levels of different machines in detail, and plan to adjust the processing sequence to effectively control the tolerance of the finished product.
- Surface roughness|:Roughness aberrations exist on the surface of all products, and the degree of roughness varies from material to material. Therefore, existing surface roughness needs to be kept in mind when selecting tight tolerances for CNC machining. Rough surfaces present difficulties when tight tolerances are the goal.
Better representation of design prototypes if you need to manufacture custom parts with valid tolerances. Aixi will be your best choice, Aixi CNC machining services are provided by a team of highly skilled experts and the most advanced machines and equipment in the market. This means that not only do you have the best tolerances that professionals recommend to use, but you also have the best equipment that can achieve those tolerances in real life.

 English
 Deutsch
 Français
 日本語
日本語
